# Settings
The settings are divided in:
- General settings, available and accessible at all times
- System parameters, available only the first time a CPU gets powered up. These should ideally be set by either the Manufacturer of the washing machine or by a Technician who knows the machine extremely well. These parameters are pivotal for the well-functioning of the entire system, so please doublecheck them carefully before confirming them.
- Default language selection: available and accessible at all times
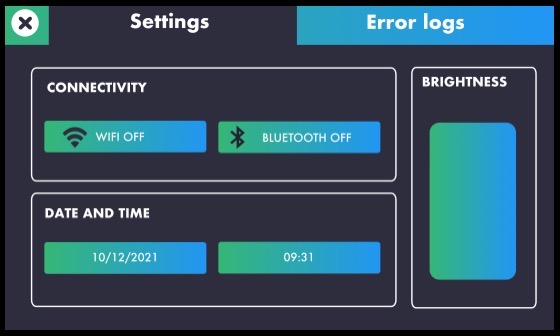
# General Settings
You can access the general settings by tapping the "settings" icon on the bottom bar. Once you access this screen, you can:
- connect Hera to wifi
- connect Hera to bluetooth
- set date and time
- regulate the brightness of the display
# Connectivity
Connectivity is a very important feature to enjoy every benefit the system can offer. With bluetooth connection, you can sync wash programs, transferring them from the Wash Configurator app to any CPU connected. With wifi connection, you can register any machine on the Smart Dashboard and get access to full reports and information on productivity, costs and consumptions and maintenance.
# Wifi
To activate wifi, tap on the wifi button that says "wifi off". Once the label becomes "wifi on", long-press on the button again and you'll be prompted to wait until the system scans the available networks. The available networks will be shown as a list on a popup that appears on screen. At this point, simply select the network you want to connect to and enter the network password. Once the connection is established, a popup will appear showing the message "Connection established". Tap "ok" and then close the wifi popup by tapping the exit icon on the top right corner.
# Bluetooth
To activate bluetooth, tap on the bluetooth button that says "bluetooth off". Wait a few moments until the label becomes "bluetooth on". At this point, you can either associate a device using the regular bluetooth association procedure or, if a device has been associated before, wait a few moments for the CPU to connect automatically. Once it is connected to a device, the label becomes "device connected".
# Date and time settings
In order to set the date, simply tap the button containing a date and select the correct date using the calendar that pops up on screen. In order to set the time, simply tap the button containing the time indication and use the widget that pops up on screen to set the correct time.
# Display brightness
You can regulate the display brightness at any time by scrolling up and down the brightness column. Alternatively, you can tap on a specific point of the column and the brightness will be adjusted accordingly.
# Default language selection
Please turn up the volume of your device to hear the audio
To change the language of the system, tap the world icon on the bottom bar. You'll see a popup containing a list of all the available languages. Simply tap on the one you wish to select and close the popup by tapping on the exit icon on the top right. It's done!
# System Parameters
# Important Warnings
System parameters are extremely important and should be set as soon as the CPU is initialised, either by the Manufacturer of the washing machine or by a skilled Technician who knows the washing machine very well. A mistake in the system parameters can result in unwanted behaviour and anomalies.
System parameters are factory settings that define how the machine is built and what kind of features are present. They are extremely pivotal to the well-functioning of the entire system, so please make you you set them up correctly and doublecheck before confirming. They can be accessed only during the CPU initialisation and once you confirm them and exit the factory mode definitely, they become unavailable for any kind of modifications.
# Instructions
Press the protected settings icon on the bottom bar.
TIP
If the icon is not available on the bottom bar, it means system parameters have already been set and confirmed definitely.
WARNING
The sequence of screens that follows will guide you through all the settings that need to be applied, so please make sure you do not skip any of them.
The first screen allows you to enter name (or id) of the washing machine, its brand and its model. Simply tap on the input fields and a keyboard will pop up on screen for you to use. Once you complete this step, proceed to the next by tapping the right arrow icon on the bottom bar.
The second screen requires details on chemical activation. Here you can define whether chemical activation shall be done through impulses or by setting an activation time. If you select "activation time", you'll need to only define the chemical product millimeters per second. If you select impulses, then you'll have to set product millimeters per impulse as well as impulse duration. Once you complete this step, proceed to the next by tapping the right arrow icon on the bottom bar.
The third screen requirs details on the washing machine drum: diameter, inclination and depth. You can set these values either by using the increment and decrement buttons or by tapping on the value and using the numerical keypad that pops up on screen. Once you complete this step, proceed to the next by tapping the right arrow icon on the bottom bar.
The fourth screen requires details on the inverter: the maximum RPM value and the maximum G value. Once you complete this step, proceed to the next by tapping the right arrow icon on the bottom bar.
The fifth screen is about spin settings: you shall define here if the ramp acceleration should be handled manually or if it's done automatically by the inverter. If you choose manual, you need to set three ramp factors: how many seconds each step should last, how many Gs per step and how many RMPs per step. Once you complete this step, proceed to the next by tapping the right arrow icon on the bottom bar.
The sixth screen is about the specific heating mode of the washing machine. There are three options available: hot and cold valves with heating resistor, hot and cold valve without heating resistor and cold valve only with heating resistor. Once you complete this step, proceed to the next by tapping the right arrow icon on the bottom bar.
The seventh screen contains details about electrical consumption: please enter the electrical consumption of the inverter and of the heating resistor (if the heating resistor is actually mounted on the machine). Once you complete this step, proceed to the next by tapping the right arrow icon on the bottom bar.
The eightenth screen requires details about watchdog times: respectively for temperature, drain and fill to be set in seconds. Once you complete this step, proceed to the next by tapping the right arrow icon on the bottom bar.
The ninth screen requires details about computing wash duration: for each wash cycle, should the countdown start when temperature is reached, when level is reached or at the very beginning of the cycle? Select the option you prefer. Once you complete this step, proceed to the next by tapping the right arrow icon on the bottom bar.
The tenth screen requires you to set whether the door digital input is normally close or normally open. If you have an additional door digital input, then select if it's normally close or normally open, otherwise simply select not connected. Once you complete this step, proceed to the next by tapping the right arrow icon on the bottom bar.
The eleventh screen starts a series of four screens related to I/O configuration: various digital inputs status and drain valve command mode that can be set either on impulses or activation time. Once you complete this confuguration, you have completed the entire system settings process.
If you would like to go back to previous screens to check the values entered or selected, you can do so by using the left arrow icon on the bottom bar. Once you doublechecked the every information entered is safely correct, then you can save the settings by pressing the save and exit button. The CPU will reset itself.
Please note that at this point you can still go back into the system parameters in order to doublecheck them once more. Then, after you are completely certain of the values entered, do the following to finalise the system parameters and make them definitive:
- Definitive finalisation
- tap the protected settings icon on the bottom bar
- select exit permanently from factory mode
The CPU will reset itself and will access the operative mode, where the system parameters are not available anymore. This step is essential.
DANGER
Make sure you do not skip step 13th before you send machines out to field.
# Demonstration video
This video demonstrates the procedure of setting up system parameters within Hera Laundry.
WARNING
Please note the values of your settings shall be customised to match exactly the washing machine you are operating.
Please turn up the volume of your device to hear the audio